Nothing in New York bonds people together in the way the subway does – everyone uses it, everyone has an opinion on their line of choice and everyone hates it during the summer. If you have never ridden in the subway before, know that it is a unique world with its own customs, etiquette, currency and navigation system, and it is unlike any place you’ve ever seen before. One could write volumes about this underground maze, so we plan on breaking it down over a number of posts and eventually offering our readers a comprehensive guide to the New York City subway system. First, there are a few basic things to know to get you on your way. If you have any questions, feel free to ask them in the comments below.
A Quick Sponsor Ad:
Finding a Subway Station
When you are near your apartment, you will likely know exactly where your closest subway stations are, but if you are in an unfamiliar part of town, you might need some help getting to the nearest subway line. Luckily for you, there are a few dozen iPhone, Android and Windows apps for helping you get where you are going, and with 468 stations in the city, you probably don’t have far to go. I have been using the CityTransit iPhone app ($2.99) for just over 2 years now and it has saved me more than a few times. If you don’t have a smartphone, you should definitely have a subway map on you when you are out and about. The subway map is not a great map for finding your way around the city, but it is handy for knowing what stations/subway lines will get you home the fastest. If all else fails, simply ask someone. Contrary to popular belief, most people in New York are not rude or mean (unless they need to be, in which case, we are pretty good at throwing down some attitude), so don’t be afraid to ask a person on the street how to get to the nearest subway station or which direction to go for a particular street. Bodega owners are also a good source of information about a specific neighborhood.

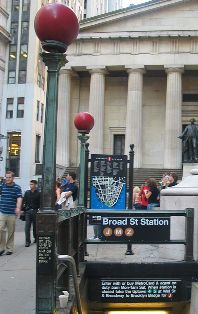
When you get to the station, you can know instantly if a particular entrance is open or not. Each station has a round ball (some people call them ‘globe lamps’) about 10 feet off the ground which is either red or green. A green globe means that the entrance is open 24 hours a day, so no worries. A red globe means that this entrance is either not open 24 hours or is exit-only. Usually if it is daytime, you won’t need to worry about this very often, but if it is late at night, make sure you check to see if there is a lit red globe before you bound down the stairs. To the left here, you can see the Red globes outside the Broad Street station in the Financial District of Manhattan.
Heading into the Subway
If you have never used the subway system before, it can be a bit confusing at first and it is important to know where you are going before you ever actually enter the station. At some stations, certain entrances only give you access to trains going one direction and you have to make sure you use the right entrance or you might end up on the wrong train. When people talk about directions with the subway, they will tell you to take either an Uptown or a Downtown train. This means exactly what you think it means – the train goes in two directions, up and down. This does not necessarily mean that the train is going North or South, but if you look at a subway map, you can get a good idea for which way is up and which way is down on a line. You might hear this intermixed with borough names. For example, if you are in Brooklyn and hear an announcement for a “Manhattan-bound F train”, this is the same thing as an Uptown F train. But if you are in Queens, a “Manhattan-bound F train” would actually be heading Downtown. So, keep in mind what part of the city you are in (and where you want to go) and it should be pretty easy to figure out which direction is the right one.
Once you know which way you need to go, you can choose the right entrance. At some stations (especially the bigger ones), it won’t matter which entrance you enter because you will be able to access both Uptown and Downtown trains when you are underground; however, take a look at the sign at the stairs – it will say Uptown or Downtown and have the symbols for each train that stops at that station. If you see that the entrance you are standing in front of only gives you access to the wrong direction, look across the street, as an entrance for the opposite direction is almost always directly across from where you are. Downtown entrances are usually on the West side of a street while Uptown entrances tend to be on the East side, but this is not a firm rule, especially when you are getting on a crosstown train in Brooklyn or Queens.
Getting a MetroCard
Each station has a few kiosks for purchasing a MetroCard, which is simply a credit card-sized ticket that you will be using to enter the subway. These kiosks are pretty self-explanatory, but there are a few options. Your first screen offers you the option of an $8 card, a new MetroCard or a single ride. If you choose to get a new MetroCard, your choice is between an ‘Unlimited’ or a ‘Regular’ MetroCard. Regular simply means that you would like to buy a card with a certain dollar value: say you want a $20 card, this is the option you will select. For Regular cards, you will notice that there are various options that say “+$1.50 bonus” or a similar value – just consider this to be ‘free’ money that you get beyond what you pay for the card. The other type of MetroCard is the Unlimited card- these cards allow you unlimited usage for different periods of time: 1 day, 1 week, 1 month, etc. Depending on how often you use the subway, you will need to decide which is more economical for you: buying a regular MetroCard or one that allows you unlimited use. Questions? Check out this video which offers a really in-depth walkthrough of how to buy a MetroCard.
Picking A Train
Getting the right train is pretty easy, though there are a couple of things to know. Every subway line is designated by a color and each color usually has 3 or 4 different routes to choose from. The 3 or 4 routes tend to follow similar paths through the city and frequently overlap, but they each have their own set of stops and sometimes diverge in very different directions. These routes are designated by a letter  or a number
  inside of a colored circle – these lettered/numbered circles will appear everywhere you see a sign for a particular subway line. So, if you look at a subway map, you will see the colored paths for each of the subway lines and each of the stations along the route will have the letter or number of each train that stops there.

Once you have gotten yourself to the right station, purchased a MetroCard and swiped your way in, simply follow the signs for the train you want, just double check to make sure you select the right direction: Uptown vs Downtown. (I once rode 30 minutes in the wrong direction, which is a good way to ruin your day.) Once you are on the platform, check the signs hanging above the tracks on each side. If your platform is 2-sided, these signs will let you know which side your train will arrive on. When your train comes in, check yet again to make sure you are on the right path: the outside of the train will have its number/letter and destination on the side of the train, so just make sure that if you are waiting for an A train, you don’t accidentally hop on an E when it pulls in.
Exiting The Station and Getting Where You Are Going
Once you are inside the train, you have gotten past the hardest part of your trip. Now, you just need to make sure you get off at the right stop. Take a look around the inside of the car and get your bearings: there will be a number of seats, though the layout will vary greatly depending on what line your are on and how old your train is. You will also see advertisements all along the edges of the ceiling and behind some of the seats. At least 2 of the ad spaces behind seats will have subway maps, so if you are inside the train and need to reference the map again, find one of these and take a look, even if there is someone sitting in front of it, don’t be shy about staring right over their shoulder or asking them to lean one way so you can see better. Inconveniencing someone for 10 seconds beats the heck out of getting lost.

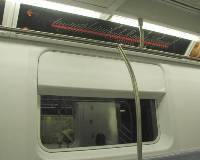
In addition, along the ceiling ads you will generally find an outline of the route for your current train. This will be a list of all the stops this train is making and will help you get off at the right stop. In newer trains, this is computerized and is very easy to understand. It will list out the next 10-20 stops for your train and will highlight the next station name as well as tell you how many stops you are from each station after the next (see it in action in this video). For older trains, there is simply a sign like the one you see to the left which lists all the stations in both directions. Find where you got on and make sure you look at the stations ahead of you in the right direction.

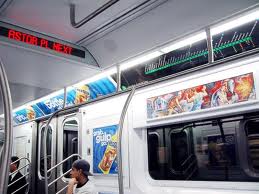
It is fairly easy to keep track of where you are as ride. At each stop, the conductor or a recording will announce the name of the station as well as what trains you are able to transfer to. Occasionally, the speakers are old or you miss an announcement, so look out the window at each station and you will likely be able to see a sign somewhere on the platform clearly labeling where you are. And if that isn’t enough, most cars have a marquee sign overhead inside the car that tells you the time as well as the name of the next stop. In this picture to the right, you can see both the station list and the marquee sign. With all of these things to help you, knowing when to getting off is not very hard at all, the most important things is to be aware of where you are when you get on and how close you are to your destination. When you reach your stop, just get off onto the platform (if the car is full, don’t be afraid to push your way out) and follow signs for the exit. Most likely this will require a combination of stairs, ramps or escalators as you make your way up to street level. And if all else fails, just follow the crowd.
One thing to know when you come out of the station is that just because a stop is named after a street, there is no guarantee that is the street you will exit onto. For example, the 34th St station on the A C E line has entrances from 31st St all the way up to 35th St, so when you come above ground, take a moment to look around and get your bearings.
A Quick Sponsor Ad:
Things To Know
The subway has it’s own set of terms that you should know before setting off. Some I’ve already covered and others are just colloquial words for things you will come across, so take a quick look before you start off:
Turnstiles: These are the first thing you encounter after getting a MetroCard; here you will swipe your card and pass through to get into the subway station. There are two types: the regular turnstiles you are used to from theme parks and football games as well as what some people call ‘meat grinders’. Meat Grinders are tall, vertical turnstiles that you swipe into and enter what almost looks like a cage. Once inside, you push forward almost like a revolving door and you pass into the station. Once you see a meat grinder, its name will make sense for its appearance rather than for its effects.
Express: Express trains do not stop at every station, they stop at major stations along their routes. These are a good way to get where you are going quickly. Some trains are express for parts of their route, but local for others and some vary depending on the time of day. Listen to the conductor and watch the station list to know where your train stops.
Local: Local trains make every stop along their route, including those serviced by express trains. Again, listen to the conductor and watch the station list to know where your train stops.
Transfer: This is both a noun and a verb and means exactly what you think. When you arrive in a station, you will hear the announcement “Transfer is available to the __, ___ and __ lines”, indicating to you what trains you can switch to (aka: transfer to) at your current station.
Platform: This is the large flat waiting area where you await your train’s arrival
Underpass: Some stations have completely separate entrances for uptown and downtown trains and it is not possible to get to the opposite platform without returning to street level. However, there are some that have underpasses which allow you to walk through a tunnel underneath the subway tracks to get to the other side.
Crazies: There are a number of different names for them, but if you say ‘crazies’, everyone will know what you mean. These are the people who will scream at you about international economics inside the subway car while they are rubbing themselves and making room on your seat for their 43 Duane Reade bags filled with amorphous God-knows-what. Now, it is important to note that crazy ≠ homeless person. There are plenty of friendly homeless people in New York and in the subways that are content to let you be aside from periodically asking for your change. A Crazy is the person that doesn’t ask you for change because they start defecating in the corner before they’ve had a chance to yell at you about it. (Obviously a good number of these people have serious mental illnesses and I’m not making fun of them… I’m just saying they exist and you should not pack up and move home just because some guy with 9 cats in a backpack and oozing sores called you a ‘pretty little girl’).
Straphanger: This is a nickname for the people who ride the subways/buses (because subway cars used to have leather straps to hang onto- buses still have some variations of this). This is not used very often today, but still good to know.
Pre-Walking: This is another one of those things that everyone has a different name for, but after you have been here for awhile you will start doing it as well. After making the same trip a number of times, you will realize what part of the train you need to be on to make your exist from your destination station the fastest, so you will walk to that part of the platform while waiting for your train to arrive. This is pre-walking.
Get On Your Way!
As with all things in New York, becoming familiar and comfortable with the subway takes time, mistakes and course corrections. Making mistakes or getting lost is bound to happen, but generally you will leran from it the first (or second) time. My first week in the city, I fell asleep one night on an F train and woke up an hour later in Jamaica, Queens – a mistake I only made once. Then after about a year in the city, I made a mad dash up Central Park West to get show tickets from a friend of mine and with only 20 minutes left for me to get to Lincoln Center, I got on an A train going the wrong direction but didn’t realize it until I was practically north of Harlem. Needless to say, I missed the first half of the show and from that day forward, I have always read the signs at the subway entrance.
Hopefully, this quick guide to the basics of subway travel in New York will help you avoid some of the common mistakes and will at least help you get around for your first few days while you get your bearings. And if there is anything else that you think is important for first-time subway users to know, let me know in the comments and I’ll add it here!